Thursday 12 September 2013

// // Leave a Comment

iPhone 5S and iOS 7 Announcements Coming Today at Apple's Campus


Capable of great things and all the little everyday things, too

iOS 7 introduces great new features like Control Center, AirDrop for iOS, and smarter multitasking. It also makes the things you do every day even easier, faster, and more enjoyable. And while many of the apps look different, the way you do things feels perfectly familiar. So from day one, you know how to use the world’s most advanced mobile OS. In its most advanced form.


Control Center 

Some things should be only a swipe away, and now they are.
Control Center gives you quick access to the controls and apps you always seem to need right this second. Just swipe up from any screen — including the Lock screen — to do things like switch to Airplane mode, turn Wi-Fi on or off, or adjust the brightness of your display. You can even shine a light on things with a new flashlight. Never has one swipe given you so much control.


Control Center : Do what you need to do. Quick.

Turn on or off Airplane mode, Wi-Fi, Bluetooth, and Do Not Disturb. Lock your screen’s orientation or adjust its brightness. Play, pause, or skip a song. Connect to AirPlay-enabled devices. And quickly access your flashlight, timer, calculator, and camera.


Notification Center 

Today is all about you
Notification Center lets you know about new mail, missed calls, to-dos that need doing, and more. And a new feature called Today gives you a convenient summary of, well, today. One glance at your iPhone and you’ll know if it’s a certain someone’s birthday, if you’ll need an umbrella, or if traffic will slow down your commute. You’ll even get a heads-up on tomorrow. You can access Notification Center from any screen, including the Lock screen. Just swipe down. And get up to speed.


What’s your day like?
Today view gives you a summary of what you need to know about for the day. And a peek at tomorrow.


See what you missed.
The new All and Missed views let you see all your alerts or just those you haven’t addressed in the last 24 hours.


Multitasking

While you multitask, it does, too
Multitasking has always been a smart way to switch between apps. Now it’s even smarter. Because iOS 7 learns when you like to use your apps and can update your content before you launch them. So if you tend to check your favorite social app at 9:00 a.m. every day, your feed will be ready and waiting for you. That’s multitasking in iOS 7. It knows what you want to do before you do.

Press the Home button twice to see preview screens of the apps you have open. To quit an app, just swipe it up and out of preview.


Intelligently scheduled updates.
iOS schedules updates during power-efficient times. Like when your device is on and connected to Wi-Fi. So your battery isn’t drained unnecessarily.


Camera:

All the right formats rights at your fingertips.

Camera in iOS 7 puts all your shooting formats — still, video, panorama, and now square — front and center. With a swipe, you can capture what you want the way you want.1 Fast. And new filters let you do even more with each image. Give it a retro feel. Dial up the contrast.
Or go black and white. Artistic license is all yours.


Photo


Life is full of special moments. So is your photo library.


Now there are faster, easier, and more delightful ways to scroll down memory lane. Introducing Collections, Moments, and Years — smart groupings of your photos and videos based on time and place. Tap Years and all your shots fill the screen. Each year holds Collections, like your trip to San Francisco. And in that Collection are distinct Moments — photos from Union Square, videos from AT&T Park. So you can find a shot from whenever, wherever, in no time.

Inside a Collection.
Tap a Collection, like “Hawaii,” and see photos from your trip organized into Moments according to date and location.


A year — or years — in review.
Tap the Year view and prepare to be amazed. Every photo and video you've ever taken appears onscreen, almost like artwork.
iCloud Photo Sharing.
With iCloud, you can share your favorite moments with your favorite people by creating a shared photo stream. They can post photos, videos, and comments to your stream, and it all appears on everyone’s iOS devices — automatically. The new Activity view lets you see the latest updates from all your shared streams in one place.


Airdrop

Drop Everything 
Sending a photo or a document to someone via text or email is fine. But if that someone is right next to you, a text or an email suddenly feels like too many steps. Enter AirDrop for iOS. It lets you quickly and easily share photos, videos, contacts — and anything else from any app with a Share button. Just tap Share, then select the person you want to share with. AirDrop does the rest using Wi-Fi and Bluetooth. No setup required. And transfers are encrypted, so what you share is highly secure.3

Share one to one. Or one to many.
With AirDrop, you can share, say, a photo or a video with a specific person or multiple people. Just tap the Share icon, select who you want to share with, and let AirDrop do its thing.

Make yourself available. Or not.
You’re automatically visible in AirDrop to your contacts running iOS 7. But you can also make yourself visible to anyone nearby using iOS 7 or to no one at all. One tap in Control Center is all it takes.

File received.
Recipients can choose to save whatever you send. When they do, the content is saved right where it should be — a photo in Photos, a pass in Passbook, a contact in Contacts, and so on.

Safari 


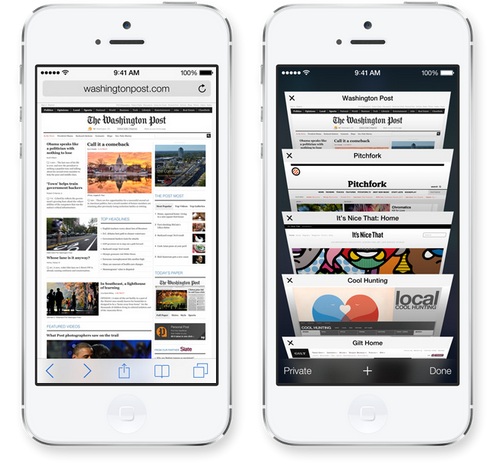
With things out of the way, there’s way more web
Browsing is bigger, better, and more beautiful with Safari in iOS 7. Buttons and bars — like the unified smart search field — stay hidden until you scroll to reveal them. So you see more content than ever on your screen. And with a swipe, you can go back or forward a page. It’s all designed so nothing gets in your way or slows you down.


Unified smart search field.
Type a URL or search term in the unified smart search field, and Safari automatically suggests the closest match to what you’re looking for. So you find the right web page fast.
New tab view.
See your open web pages in a consolidated view that lets you scroll effortlessly from tab to tab. To close a page, just swipe it offscreen.


Shared Links.
See all the URLs in your Twitter timeline, who posted them, and what they had to say about them.


Reading List.
Reading through the articles in your Reading List is quick and easy. Simply scroll seamlessly from one to the next.


iCloud Keychain.

Lots of things you do on the web require passwords. Now iCloud can remember your account names, passwords, and credit card numbers for you. And Safari will enter them automatically whenever you need to sign in to a site or shop online. It works on all your approved iOS 7 devices and Mac computers running OS X Mavericks. And with 256-bit AES encryption, it’s highly secure.
>


Password Generator.
Every time you create an account, you can have Safari generate a unique, hard‑to‑guess password. And remember it for you.


iTune Radio


Hear where your music takes you
iTunes Radio features streaming radio stations you’ll love from day one — from the best selection of music. The more you listen, the more personalized it becomes. And it’s available on your iPhone, iPad, iPod touch, Mac, PC, and Apple TV for free. Its radio re-imagined.Learn more about iTunes Radio


See what you've heard.
View the History of everything you've heard or added to your Wish List. Then tap to download the songs you want from iTunes.

Edit on the fly.
Build new stations while you listen, and control the balance between playing the hits and discovering less familiar songs.


Go from your music to more music.

You can access Featured Stations, stations inspired by music you choose or already listen to, and more than 200 genre based stations.


Siri
You're going to like what you hear. And see

Siri in iOS 7 gets a new look, a new sound, and new capabilities. It features a redesigned interface that fades into view — on top of whatever’s on your screen. A clearer, more natural-sounding female or male voice makes Siri even easier to understand. It’s faster at answering questions and it checks more sources, such as Bing, Wikipedia, and Twitter. And Siri takes on extra tasks, like returning calls, playing voicemail, controlling iTunes Radio, and more.


Siri knows you’re talking.
Now when you ask Siri something, audio waves move across your screen, letting you know Siri is listening and processing your request.


Start in Siri. Stay in Siri.
If you have questions, Siri has answers. And you’ll see them right on the screen. Even web search results from Bing. So you won’t be pulled out of Siri and into Safari just to see the same list.

Siri searches Wikipedia.
Siri now references Wikipedia to answer your questions.

Siri searches Twitter, too.
Want to know what people are tweeting about a certain topic? Just ask.


App Store : 
Find the right app for wherever you are.
Apps Near Me — a new feature of the App Store in iOS 7 — shows you a collection of popular apps relevant to your current location. And a new Kids category spotlights the best apps for children based on age. iOS 7 also keeps your apps up to date automatically, so you don’t have to bother. Another bonus of automatic updates: no more little red badge begging for your attention.

What’s popular near me?
Wherever you find yourself — the Louvre, for instance — tap Near Me and you’ll see a list of apps you might find useful.
Browse the best apps for kids.
Now parents and teachers can quickly find apps that are perfect for children. Just visit the new Kids category for a curated selection of age‑appropriate apps.


Find My iPhone 
And if you can’t at least there’s this

Losing your iPhone feels lousy. Thankfully, Find My iPhone can help you get it back. But if it looks like that’s not going to happen, new security features in iOS 7 make it harder for anyone who’s not you to use or sell your device. Now turning off Find My iPhone or erasing your device requires your Apple ID and password. Find My iPhone can also continue to display a custom message, even after your device is erased. And your Apple ID and password are required before anyone can reactivate it. Which means your iPhone is still your iPhone. No matter where it is.

Lock screen message.
Even after a remote erase, Find My iPhone can continue to display a message with your phone number on the Lock screen.
Your iPhone made it home.
If you get your iPhone back after you’ve already erased it, just enter your Apple ID and password to reactivate it.


Coming Soon


iOS in the Car 
Best passenger ever
iOS in the Car seamlessly integrates your iOS device — and the iOS experience — with your in-dash system. If your vehicle is equipped with iOS in the Car, you can connect your iPhone 5 and interact with it using the car’s built-in display and controls or Siri Eyes Free. Now you can easily and safely make phone calls, access your music, send and receive messages, get directions, and more. It’s all designed to let iPhone focus on what you need, so you can focus on the road.

Commute summary.
iOS in the Car knows when you’re leaving home for work — or vice versa — and displays traffic conditions and your ETA.

Siri handles calls.
Siri will play back your voicemail and return missed calls, if you ask.

iTunes Radio and more.
Use your car’s onboard controls for your music, including iTunes Radio, audiobooks, podcasts, third-party audio apps, and more.

Navigate with Maps.
Get turn-by-turn directions with Maps. Enter an address or let iOS in the Car serve up any address you received in an email or text.

Get the message. And send one, too.
Text messages appear right on your car’s display. Siri can read them to you while you listen over your car’s speakers. And to reply, just dictate to Siri.

Read More

Tuesday 12 February 2013

// // 4 comments

How to Manually Install Apps on iPhone without JailBreak


Install Whats-app On iPod Touch and iPad 

Requirement 

All you need is iPhone Configuration utility and iTunes.


1. Open your iTunes and looks for the App that is not compactable with your iPod Touch or iPad
2. Install and open the iPhone Configuration utility before that make sure you connected your iDevice on Windows PC or Mac


3. Check on the left panel on iPhone configuration utility.
Click on application, Add file and locate the .ipa file you want to add or simply drag and drop the .ipa file to iPhone configuration utility
You can Locate the .ipa at the following path
For Mac user
/Music/iTunes/iTunes Media/Mobile Application
For Windows user
C:\Users\USER\Music\iTunes\iTunes Media\Mobile Applications
Note : The paths mentioned above are default ones, if you changed the path them check the .ipa file there.


4. Check for Devices on the left panel on iPhone configuration utility and make sure your iDevice is listed.
Click on your device and go to application. A list of applications will will shown and in our case you can see Install button next to wahts app. Click on it and allow few seconds
Give it some time it will be installed on your deice and you will see the uninstall button next to the app installed.


5. Now you can enjoy whatsapp on your iPod Touch or iPad. You can also do the same for other apps to make it force install if its not compatible with your iPod Touch or iPad
Screen Snaps from iPod Touch.


Read More

Tuesday 23 October 2012

// // 1 comment

How to Setup iTune WiFi Sync


Tired of tethering to iTunes and wondering how to set up iTunes Wi-Fi sync? It works just like traditional USB sync but without the cable! (Without the sync cable that is, you still need to be plugged into a power cable -- baby steps!) Here's how to get it going:
  • Make sure your iPhone, iPad or iPod touch is connected to your Wi-Fi network and running iOS 5. (Here's how to update to iOS 5)


  • Make sure the PC running iTunes is connected to the same Wi-Fi network and is running iTunes version 10.5
  • Plug in the device you want to setup Wi-Fi sync with
  • When its been recognized, click on it in the left column then select Summary in the header bar
  • Scroll down until you see the option for Sync with this iPhone over Wi-Fi
  • Click the box to turn it on
  • Hit Apply
That's it, now as long as iTunes is open on your PC, as soon as you plug your iPhone, iPod touch, or iPad into the power outlet, it should appear in iTunes and sync over Wi-Fi.
(Yes -- It has to be plugged in to the power for this to work, so you are really just cutting the cord to the PC not to the wall!)
If you want to initiate a sync manually, you can do this from your iOS device and you don't need to be plugged into a power outlet.
  • Go to Settings
  • General

  • Click on iTunes Wi-Fi Sync
  • Click on Sync Now
That is all there is too it, you can now sync your iPhone, iPod touch, or iPad without the cable. Well without a cable connected to your PC anyway!
Read More

Monday 22 October 2012

// // 1 comment

How to Show Battery Percentage on iPhone 3GS, iPhone 4 and 4S


Since the iPhone 3GS, several nice, little features have been included. One of my favorites is the ability to show a percentage of the battery life in the upper right hand corner instead of just the battery graphic. Here is how to do it. Update: these settings can be found on any modern OS device now including iPhones, iPads, and iPod Touch devices.

More data is better, right?

Be sure that your device has been updated to one of the latest iOS versions. Then follow these steps to show your percent of device’s battery life.

1. Click Settings
2. Click General
3. Click Usage
4. Toggle Battery Percentage to ON


Read More
// // Leave a Comment

How to Increase Battery Life of your iPhone, iPad or iPod Touch


With each update of the operating system that powers Apple’s mobile devices, many users experience issues with decreased battery life. The increasing popularity of location based apps and iCloud syncing are partly to blame for the increased consumption. Increasing available of LTE increases battery usage as well. By changing some simple settings on your Apple device, you should be able to improve your battery life and charge less frequently.

By the way, if you are worried about your battery life, you will want to enable ShowBattery Percentageso you can more accurately measure your battery levels.

Do I have a battery problem?

Heavy internet, GPS, or gaming use will crush the battery on any device, but with minimal usage, any apple devices should easily make it through a day on one charge. At the end of the day your standby time should be much greater than your usage time. If the amount of time recorded for your standby time is much lower than you expect, that means your phone is using energy when you do not expect it.
You can check this through the following steps:

Settings -> General -> Usage

Do I need to recalibrate my battery?

LIthium ion batteries like Apple products use usually do not benefit from a “recalibration” by completely draining and full recharging the batteries. In fact, doing this too frequently will decrease lithium battery life. Apple does recommend doing it at least once a month to keep the battery monitoring system working correctly. Most people with battery drain issues will be draining and recharging frequently already. Although easy enough, recalibration is almost never going to help.
Recommendations
  • Disable Sending of Diagnostic and Usage Data. When this is enabled, Apple receives information from the users to help tweak and fine tune future editions of the software. However, in some cases a badly performing app can repeatedly trigger crash reports. Some of these crash reports are unusually large as well. Sending this data over and over can drain a battery relatively quickly. As disabling this will cause the user no noticeable effects, this is the first thing I recommend. You can disable sending this data by doing the following:
             Setting -> General -> About -> Diagnostics & Usage -> Don’t Send
  • Disable Bluetooth / Wi-Fi. This one is obvious and is an old trick. If you never use bluetooth, you can save a nice junk of juice by disabling Bluetooth searching and connecting on your device. Likewise, if you are in an area where you know you are not going to be using wi-fi, you can temporarily turn it off. Although obvious, these hints are essential when using heavily dependent GPS tracking apps over long periods of time. Running and tracking apps are well known battery drainers through the heavy use of GPS; however, when you exercising or hiking, you are really unlikely to need bluetooth or wi-fi. In fact, if you don’t even want to receive calls during this time, just place it in airplane mode. Turning these unessential services off improves your chances of completing that 20 miler marathon prep with some battery still intact. The only downside is you have to remember to turn them back on when you return to civilization.

               Settings -> Wi-Fi
            Settings -> General -> Bluetooth
  • Disable Automatic Time Zone Determination. The way OS X determines your location and sets your time zone automatically is very clever. However, in certain circumstances this frequent use of the GPS can cause battery drain. By enabling this only when you travel, you remove a potential waste of battery.

            Settings -> Location Services -> System Services -> Setting Time Zone

  • Disable Useless Locations Services and Notifications. Each time your device uses the GPS to determine your location or wakes up your phone to deliver a notification, a tiny bit of battery is used. If you are using these excessively, those tiny bits add up. Review these areas and disable what you don’t need.

              Settings -> Location Services -> Select individual apps to disable
            Settings -> Notifications -> Select individual adds to remove from

            Notification Center

  • Decrease Screen Brightness. I like my screen as bright as the sun. Literally, I crank up the brightness as high as it will go and turn off Auto-Brightness. Powering that bright screen drains battery. If you can tolerate it, do not be like me and go ahead and decrease your brightness. You will definitely save battery.

              Settings -> Brightness

  • Disable Push Email. Apple has never been very robust in the enterprise environment. Many “pushable” email account connections are still not perfect. If you can tolerate not receiving your email instantaneously, changing your email to fetch will improve anybody’s battery. Fetching less frequently will use even less battery. If you have a troublesome email account, this may fix your battery issues altogether.

               Settings -> Mail, Contacts, Calendars -> Fetch New Data -> Push -> Off
            Settings -> Mail, Contacts, Calendars -> Fetch New Data -> Set Fetch Rate  
            to lowest  tolerable time.

  • Decrease or disable iCloud. Many people have reported that iCloud seems to have several bugs that decrease battery life. Since iCloud is a large component of iOS 5, I hesitate recommending that someone not use it. If you have a MobileMe account, continuing to use it until iCloud is more stable is one option. What I am currently recommending is just temporarily disabling it for a couple of days to see if the battery issues are related to it. If it doesn’t help, then just turn it back on. Decreasing what you sync over iCloud will help. Decreasing iCloud sync over cellular should improve battery life significantly too:

             Settings -> iCloud -> Documents & Data -> Use Cellular -> Off
  • Remove and replace email accounts. As noted above, poorly performing email accounts are the root of many users’ issues with battery life. These bugs are usually carried over from settings in iOS 4. Removing and then re-adding these email accounts should remove these issues. Of course, deleting and then replacing your email accounts is highly annoying. Make sure you have the prior settings written down (or that the information in iTunes is correct) before deleting them. Removing your accounts can be performed through the following command:

           Settings -> Mail, Contacts, Calendars -> Select Account -> Delete Account
  • Wipe and Reset. Nuking your phone and starting over is pretty painful; however, this frequently is the only true option that works. There seems to be a bug in systems restored from backup that causes massive battery drain. Make sure everything has been moved off your phone and you are well synced with iTunes. Wipe your phone and then setup the device from scratch on iTunes again without restoring from backup. The command to totally reset and wipe your device can be found at the following:
           Settings -> General -> Reset -> Erase All Contents and Settings

Selectively performing these tweaks will improve anybody’s battery life. If you are experiencing one of the bugs in iOS 5 that is crushing your battery life, these hints can save your sanity. Good luck. If you figure out anything else that helps, feel free to post it in the comments below.
Read More

Saturday 20 October 2012

// // Leave a Comment

Sync your iPhone music with iTune

Its wounder full thing to transfer Music & Video through your iTune, iTune is compact tool for all Apple Iphone, if you purchase the new iPhone and you don't know how you use the iTune then its very important for you. iTune is the tool for the transfer the data like music, video, Images, TV Show and install the latest update etc. User Guide

  • Download the iTune and install you PC & laptop for installation tips. (Click here)
  • Connect your iPhone to PC & Laptop and iTune open automatically .


  • When iTunes launches you’ll be asked to activate the iPad, agree to its Terms and Conditions, and register your device.
  • Now go to the Music or Video which you want to transfer in you iPhone.
  • Drag & Drop the music folder in iTune Music its finish automatically and you get you song in iTune.

  • Then go to the menu and add the New Playlist and given the name whatever you want.(Second option in down left side its show (+) click that one and add the playlist.)

  • After that select your Music and send the newly made playlist using drag & drop.(I made a playlist named "Normal Music"

  • Then click the you Device option and select the "Music" if you transfer the video then selecting the video.

  • Make sure that you select "Selected playlist, albums,artist & genres.   

  • And then go down and select your made playlist.

  • Finally click the "Apply" its go. your playlist is transferring to you iPhone

  • See the status of transferring the Music 


  • After transferring the status is show " iPhone Transferring Complete Ok to Disconnect"


  • Disconnect you iPhone on Computer  and open the iphone lock and go to the iphone, and there you see the playlist that you made in your PC.
  • Click the Newly make playlist and enjoy to listen you Music.

If you have any problem to sync the music fell free contact me.

for more help see the video..........(Coming Soon)


Read More